Sunday, December 29, 2013

Y&FH December Challenge Reminder

Good morning everyone!


Today Team Fumi is popping in over at the Yumi & Fumi Handmade blog to remind you that we still have a challenge going on.  Make sure to stop by the Y&FH blog to see what the other ladies have up their sleeves.  They are sure to bring smiles to your faces and get you itching to make something for our challenge.  Here's a reminder of the photo inspiration:


Hehehe, seriously I have no idea how the picture is doing that, but I love it!!  I really wish I had a room like this in my house.  hehehe.  For my project I created a calendar which I just might hang up at work.  My inspiration came from one of the coolest cards created by my cool crafty friend and former DT gal, Sandie Dunne, featuring our Back 2 School kids.  Mine isn't as fabulous as hers, but I like how it turned out just the same... Oh and I embraced some white space too, well I tried.. (haha)


After I stamped the images and colored them I free-handed the 2014 behind them.  The calendar pieces are from Island Scrapbooking which I picked up while on vacation in August.  So happy they were able to fit on to the 12 x 8 1/8 piece of beautiful DCWV patterned cardstock.  Yes the calendar is that big!  I used my favorite EK corner punch and added them to the image.  Kept it CAS which is nice for a change.  Decided that the white space looked just right for this piece.


Now that I look at this, they look almost like an ad for Guess or A&F.  (lol)  Hey I did say ALMOST! (LOL)  I hope more of you will come and play in our challenge, you have until Friday to link up here.  Well thanks so much for stopping by today.  Have a fabulous Sunday!

Hugs,
Leanne

Friday, December 20, 2013

LFF #65 - Warm wishes...a birthday card

Happy Aloha Friday!

Today I'm jumping back in with a Lilo's Fun Friday share, it's been quite some time.  In the midst of all the Christmas crafting I took some time to make a birthday card with one of my pre-made BG cards. This one was a lot of fun to make.  I combined two stamp lines to make this card for my friend & co-worker, Doreen.

Anya Strolls & Kiki

I did a slight alteration to Big Anya Strolls from TGF.   First I gave her a haircut and then I replaced her cute little dog with a bigger cute dog named Kiki from Sister Stamps.  I also gave Anya some glasses.  Now Doreen doesn't have bangs like her, but she at one time did so I thought hey why not again? :)  After I colored both Kiki and Anya I fussy cut them both out and used pop dots to add to my card base.  Kiki is colored to look like Doreen's dog Princess who is her pride and joy, I hop I did her justice.  ^.^  Here's a close-up of both of them...

Anya & Kiki

Normally when we celebrate a birthday at work, Doreen is the one who bakes for us.  When it comes to her birthday, we've just ordered or picked up something in the past trying to give her something she would like.  This year I thought it would be fun to ask another co-worker to help me make her birthday dessert.  So I happened to ask her if she wanted to still have a fruit tart or chocolate cake from Porto's to which she actually changed her mind.  She asked for cupcakes instead.  White or yellow cake, any type of frosting with a fresh strawberry on top.  I asked if she was sure and she said yes.   So for her birthday she got what she wanted and she was really surprised with the results...

Yellow cupcake with pink frosting topped with a 1/2 strawberry

Luckily we have several bakers that work in our office so I asked one of them for help and boy did she come through!!  The cupcakes were delicious, but the best part was seeing Doreen's face when she first saw the dessert.  Priceless!!

Cupcake display with cupcake signs

Jean, the ones that made the cupcakes, did a wonderful job, exactly what I/Doreen asked for.  I took a picture of all the piping she did too... 

Piping rock star!!

Can you believe she did the same to 23 more cupcakes?!! Yep, she's a rock star.   Here's a little collage I made including a picture of the b-day girl. :)

Happy Day for Doreen!!

Well thanks so much for stopping by.  I know I've been such a bad blogging friend and I appreciate everyone that comes and leaves a comment.  I hope to be better at stopping by old friend's blogs and seeing what you've been up to.  Mahalo!!  Have a super awesome Aloha Friday!!

Hugs,
Lilo

Monday, December 16, 2013

Whoots ready for Christmas?

Hello!

Today I have a really fun card to share in keeping up with the Christmas/Holiday theme.  Meet the adorable owls from Art Impressions...

Whoot's ready for Christmas?

These adorable little owls are the Five Whoots (sounds like an A Capella group) and I paired them up with the fence which is also from Art Impressions.  If you can't tell I did mask the owls and then stamped the fence so that is looks like they are sitting strategically on top.  I then added in the trees to the back drop using a few Copic markers.  At first I used a Inkadinkado Christmas tree, but it didn't give the same feel as these trees did, so I'm glad I went over them with the dark green markers.  I had to add extensions to the fence so I stamped and colored out a few slats, added in and trimmed them off.  Instead of giving a nice blue sky I decided to go with grays and then added in some snow.  The simple sentiment makes a bold statement right?!  Thought the red would give it that extra punch of color and it works really well on the dark brown.  (I used the C.C. Designs Cutter Bubble Alphas).  I had a lot of fun creating the scene on this one layered card. 

Merry Owls

As I was browsing the AI website I saw that they do have a challenge blog and the current challenge is Making Spirits Bright.  I think my card qualifies.  :)  Okie dokes, that's all I have for today.  I hope you're all having a good Monday.  Take care and I'll see you soon!  Mahalo for stopping by!

Hugs,
Leanne

Sunday, December 15, 2013

Mele kalikimaka!

Good morning!

Popping in for a quick share.  Hope your weekend is going well and that you're having fun wrapping up all the holiday crafts and gifts on your list.  Here's a card I made using no pattern paper!  I heard some of you gasp, but it's true.  (hahaha)  I sometimes like to make my own backgrounds.  For this card I used stamps from Yumi & Fumi Handmade, Dandelion Designs & Stampin' Up.  The embossed background is a Lifestyle embossing folder which is slowly becoming one of my favorites.  For my color scheme I used the current Yumi & Fumi December photo inspiration and for a little fun added some green to the mix. I had a few of those Tim Holtz Christmas trees left over so I used one and distressed it a little, added a ribbon then mounted it on to kraft cardstock and it was done. 

mele kalikimaka! \nm/

The fun thing about making your own patterned paper is you can add anything you like.  I went super simple with two stamps but used two different colors to stamp with.  Adding the embossing gives it a really nice texture.  This card has already found a home with a very sweet crafty friend.  I hope she likes it.

Don't forget you have a few more weeks to play in our current monthly challenge at Yumi & Fumi Handmade.  Link up HERE.

Summer Fumi


Mahalo for stopping by today.  For me, it's back to the craft table to see what other items I can put together! See you soon!

Hugs,
Leanne

Saturday, December 14, 2013

Happy Birthday... Rosemary!!

Hello lovely friends!!

I know we're all in the midst of the holidays, but today I get to share a birthday post!!  Woo hoo!! Today is a special day, it's Rosemary's birthday and we're celebrating with her on the Yumi & Fumi Handmade blog!  You know her as an extraordinary crafter in blogland but I personally know that she's an awesomely sweet lady and a super mom & wife to her family!!  She's also a fantastic teammate and I wish I had as much talent in me as she does.  I'm truly blessed to call her friend. 

Happy Birthday to our beautiful Team Yumi captain, Rosemary!! 

It's my birthday!

Don'tcha love this picture?!  I hope she doesn't mind me sharing this beautiful shot of her from her FB page. :)  It's one of my favorites of her.  Our Y&FH o'hana has some birthday wishes to send to Rosie as well as some gorgeous birthday cards to share.  Make sure to head on over to the blog to see the rest of the gorgeous projects from the DT, and while you're at it leave them some love on their blogs.  They'd love it!  

Without further ado, this one was made especially for you!!  
Have a fabulously wonderful day!! Sending big gigantic hugs your way!

Happy Happy Birthday Rosemary!! 

Yumi Peace Sign

I went super CAS here, but this still has a festive feel too it.  If you're also celebrating today: Happy Birthday!!  I know for sure I have at least 5 other friends celebrating today.  Hope you all have a fabulous day!!  Now if you don't mind, could you please head on over to wish Rosemary a fabulous birthday? (Rosemary's blog)  I know she'd love it  :)
 
Peace!


Mahalo for stopping by!  Have a fabulous December 14th!

Hugs,
Leanne

Friday, December 13, 2013

KBD Challenge #14 Mid-Inspiration - Ready for a Snow Fight?

Happy Aloha Friday everyone!

Hope you are all doing well.  Can you believe in just a few short weeks we'll be celebrating Christmas?!!  Yikes!  I better get hopping on my shopping and card-making...  So late in the game I think I'm going to have to come up with something easy.  Hope you're not like me the consummate procrastinator.

Today on the Kitty Bee Design blog, the Bees and I are sharing our mid-inspirations for our current challenge:


If you haven't had a chance to link up you have until Dec 20th.  Stop by the Kitty Bee Designs blog to see their mid-inspirations from my teammates.  They are so darn cute!!  >.<

For my project today I made a Card in a Box using the adorable Snow Penguin from Kitty Bee Designs, some gorgeous Christmas papers from DCWV and some beautiful snowflake stamps/dies from Stampin' Up.

Card in a Box with Snow Penguin

Isn't Snow Penguin adorable?!!  I think so and I loved coloring her up in to a blue penguin!! hehehe..  Snow Penguin is hiding out behind the snowflakes cause she's ready to pounce on anyone who'll play with her.  She's got her snowball ready just in case.  hehehe.. I also gave her some non-traditional Christmas colors and had fun with her beanie, trying to create a plaid/gingham feel but failing horribly.  I need to go and check out my buddy, Rosie's tutorial to see how the professionals do it.  All-in-all it turned out cute and for my first time I'm gonna give it a B-. (hahaha)

What do you think of the box?  Isn't it fun?!  My crafty buddy, Kathy, held a little workshop at our friend Angie's last weekend and this is what we made.  Well not exactly the one above I created a new one for today's share, I'll share the one we made at the end of my post.  I couldn't wait to get home to try to make another one.  I chose some beautiful Christmas paper from DCWV.  The vintage papers were perfect for my card.  I stamped and die cut the snowflakes with Colorbox, Encore, and Archival Brilliance inks for a nice shimmery look.  The stamps and matching framelit dies are all from Stampin' Up. They are gorgeous aren't they?  I used an EK punch for the sentiment  which happens to be from AmyR. I added some pretty glittery snowballs from Recollections and a nice ivory sheer ribbon for my bow. 

The cool thing about this card in a box is that it folds flat so you can mail it!!

Card in a box - folds flat!


Isn't that paper beautiful!! You can even see some of the gold stars!  Anyhoos, yes this folds flat so it's easy to mail out!  I used Tea Dye Distress ink to give it a more vintage-y feel.  Another cuter version of the flat fold...

Cuter verision - It folds flat for easy mailing :)

Below is a picture of the back side where I will write a Christmas note to the recipient, the cool thing is this is how the back part of the card in a box stays up instead of folding down like the other panels.  Cool yea?!


Here is a nicer clear visual of Snow Penguin behind her wall of snowflakes.  :)

Snow Penguin is ready for a snow fight


This is the box that we made.  My friend Kathy did all the prep work for us.  All we had to do was try to put it together.  She was even game for us to use her stamps and dies.  Aren't the colors gorgeous?!!

Card in a box

I went super colorful to try and match the dp.  I thought this was so cute that I had to try to do another one.  It did not take too long and I love how you can change up the theme for a new one.  Definitely keeping this in my memory box! :) 

Snow Penguin - Wanna Play?

Alrighty, I hope you'll be able to join us before the 20th.  For now have a wonderful Aloha Friday!!
Mahalo for stopping by!!
Hugs,
Leanne

Challenge(s):
Totally Papercrafts Challenge

Friday, December 6, 2013

KBD Aloha Friday Challenge #14 - Christmas Challenge

Hello everyone!!

Are you ready for a new challenge from Kitty Bee Designs?  Today the Bees and I are sharing our inspirations for our last challenge of 2013:


Pretty easy right?  All you have to do is create a project with a Christmas theme.  That should be fairly easy to do since most of us are all in the middle of making projects for this wonderful time of year.  Make sure you stop on over to the Kitty Bee Designs blog to see the adorable creations from the Bees team.  I can't stop smiling over how creative this team is and neither will you... :) 

For my project I decided to make a card.  I was inspired by the new Deconstructed Sketch (#129)  because I love the CAS layout and Jen's adorable sample.  I used some of my new dies from MFT, a few sheets of patterned paper and an adorable Christmas Owl from Kitty Bee Designs and came up with this...

Merry Christmas owl - KBD

Don't ask me how I got the snow to fall, it was something that I was able to copy when I uploaded my picture.  Cute yea? (hehe)  The card base is white Neenah cardstock that was embossed with a Darice snowflake embossing folder.  On top of that I used an MFT tag & framed greetings die-namics dies.  The patterned paper is from a very old and still useful DCWV Christmas paper pad.  The owl was colored with Copics, and I used a circle Spellbinder to cut it out.  Matted it to a red circle and for the finishing touches I added that cute white pom-pom to the end of the Santa elf hat, some glitter snow to the trim and blue pearl pen dots for the berries.  The last parts were the ribbon, button and twine to finish off the tag.  The sentiment is an AmyR one which was nice and simple, yet perfectly fits my card theme.  (yay!)

Christmas owl

Alrighty, the challenge ends on Friday, December 20th and the winner will be announced on December 22nd.  Ho plenty of time to play so after you ooohh and aaahh over at the Kitty Bee Designs blog, upload your project so we can do the same! :)

Mahalo for stopping by.  Hope you all have a wonderful Aloha Friday and a great start to your weekend!! 

Hugs,
Leanne 

Challenge: DS129

Monday, December 2, 2013

Cyber Monday Blog Hop with The Greeting Farm

Hello and Happy Cyber Monday!

Today I'm so happy to be joining a group of crafters who love The Greeting Farm in an awesome blog hop.  Make sure to stop by The Greeting Farm blog for the full list of participants and make sure to leave a comment below and on everyone's blog, there just might be some prizes a long the way.


It's been so long since I created something with a TGF stamp, I feel so bad!  I thought I'd go with an oldie and use her for a fun Christmas project.  I've been having a lot of fun with big tags so I thought I'd keep it simple and use some traditional colors for this one.

Angel Anya Christmas tag

This is Angel Anya and she was one of the first stamps I received when I was first introduced to The Greeting Farm.  She's still a classic beauty and one of my favorites.  I also added the beautiful TGF snowflake die right behind her.  Alrighty, gonna keep it nice and short so you can get to the next blog. Hope you enjoyed my project.

Top of the tag

Mahalo for stopping by, wishing you all a happy cyber Monday and happy shopping/hopping!  Don't forget to leave a comment before you goooooo!!  Go back to The Greeting Farm BLOG...

Angel Anya

You have until NOON tomorrow (CST) to enter to win and winners will be announced shortly after on the FACEBOOK page!  GOOD LUCK to all!

Hugs,
Leanne

Sunday, December 1, 2013

Y&FH December Month Long Challenge

Hello!

Happy December 1st!  Today we at Yumi and Fumi Handmade have a special tradition for December. We always do a month-long challenge in December so our Design Team can have the extra time to spend with their loved ones. They work extremely hard throughout the year to bring you amazing inspiration so it's always nice when we can give them time off to relax and really enjoy the holidays!! But don't fret, there will still be inspiration in December for you to enjoy so be sure to check back to see what we have going on!
Starting today our month-long challenge is this gorgeous PHOTO INSPIRATION!!


Now remember before linking your card, please read our new challenge guidelines by clicking HERE. Don't forget that we now allow ANY stamped image!!! You HAVE to use a hand-colored image on your project...no "sentiment only" cards allowed. However, if you use a Y&FH image your name will be added a maximum of 1 extra time after the last name in Inlinkz. Remember... only 1 entry per person.

What's up for grabs? The winner will receive a $10 gift certificate to the Yumi & Fumi Handmade online store and our Top 3 will receive a 10% discount!! 

Click HERE to view the beautiful samples from Team Yumi to get you inspired!!

So I decided to jump in with Team Yumi to share my finished (just in the nick of time...) card...

Using Fumi from the Yumi & Fumi original stamp set

Season's Greetings with Fumi

Can you tell I tend to go with as much in the picture as I possibly can?! hahaha!!  But no matter, I love how this turned out!! ^.^  Including the golden yellow balls on the tree!  (hehehe)  I used my Sizzix TH tree die with some gold & ivory Latka paper.  The texture is almost like Japanese washi paper.  

Season's Greetings close up

The wreath was cut out with a wreath die from Lifestyle Crafts.  I used some silver Mixatives from Adirondack by Tim Holtz to make it nickel shiney bright.  The chair is from The Greeting Farms Sitting Casual set.  There is some burlap for a nice area rug   The sentiment is a new AmyR one and I stamped it on to a scrap of white cardstock and outlined it with a silver gel pen.  


The yellow balls on the tree are Viva Decor pearl pen drops and I mimicked the lights in the photo to match my tree and the gifts are all hand-drawn by yours truly using some gel pens. The last touch was to emboss the backdrop with a new embossing folder from Lifestyle Crafts. It really gives it a nice touch.

And there you have it.  I hope you're inspired to play in our month long challenge.  You have until Friday, January 3rd, 2014 to link up. We'll announce the winner and top 3 picks on Saturday, January 4th!
Fumi

Good Luck everyone!!  Mahalo for stopping by!! ^.^

Hugs,
Leanne

Sunday, November 24, 2013

Some Fall projects

Hello!

I was in the mood to make some small cards and a tag using this really pretty Fall bamboo washi paper from Hanko Designs. I added it to some kraft and mustard colored cardstock with a few additional accents: twine, buttons, ribbon and some canvas paper.  I didn't want to color all of the images I chose so I stamped two of them on to kraft cardstock and used a versamark pen to shade in the images.  First up is the tag I made using Kiki from Sister Stamps, a hello sentiment from Paper Smooches, a heart punch, a Fall colored canvas paper leaf, button, ribbon and twine...

Hello Fall tag with Kiki (Sister Stamps)

This next one is a small card featuring Shin-Shin from Sister Stamps.  Also stamped him on kraft cardstock and colored in with the same versamark pen.  Stamped the hello sentiment inside a punched heart.  Added some twine, a button, distressed the edges and lastly rounded the corners.

Hello Fall card with Shin-Shin (Sister Stamps)

This last card I shared on the Y&FH blog the other day.  I colored Summer Chuckles with a few Copics and decided to put him in a polaroid frame.  Stamped "many thanks" from Paper Smooches and attached it to the front of this small card.  Rounded the corners, distressed the edges and added some twine and I was done. (Playing in C4C213 challenge & 2 Sisters challenge #171)

Many Thanks from Summer Chuckles

That's all I have for today.  Wishing you all a really awesome Sunday!

Hugs,
Leanne

Wednesday, November 20, 2013

CARD for Lola

Today's card is a super CAS one.  My dad asked me to make a card for my aunty Lola's birthday.  Every year she and all her sisters take a trip to Las Vegas for her birthday.  My parents have been going every year to celebrate since my uncle passed away.  Each year I give her a colored image card, but this year I wanted to do something a little more grown up, but still sweet.  Here's what I came up with...

Birthday card for Aunty Lola

I used up more of that chevron and yellow wood grain papers.  I wish I had picked up a couple more sheets of it, I really like both.  I also used some of that pretty floral paper to create the layered flower pictured here using some Noor Designs 8-petal dies.  I alternated between the floral print and the yellow cardstock using all the dies that are in the set.  The leaves are cut with a Paper Smooches die (Poinsettia) and stamped with a Inkadinkado background stamp.  For the ticket, I stamped a Happy Birthday stamp sentiment from AmyR, masked it and stamped a wood grain background over it.  Added a button, a doily, some twine and rounded the corners on two sides and I was done.  Oh and I also distressed all the paper edges with Vintage Photo Distress inks.

Mahalo for stopping by today.  Glad it was a short post... Have a great day!

Hugs,
Leanne

Tuesday, November 19, 2013

Star Wars Birthday card

Hello!
I'm popping in with a fun card I made for my Godson's birthday.  He's turning 6 on Thursday, but his parents decided to have his birthday party this past Saturday.  The theme of the party, cause he's always having a theme, was Star Wars!! Woo Hoo!! Well now, his card had to be themed the same so I went to the internet and looked for some images.  I decided to keep it simple:

Star Wars birthday card

I took the Star Wars logo and added my own caption.... This was printed out on photo paper, sorry it looks so bad, I was in a hurry to get to the party and did not take as great a picture as I had hoped.  The card itself is black.  I matted the logo onto yellow cardstock and then to the black cardstock.  The inside was also fun.

Master Yoda wishes Padawan Brendan a Happy Birthday!!
 
I found this really cool picture of Master Yoda, so I printed it out, on photo paper and added some die cut words that spell out MASTER.  I also printed out that adorable The Force boy from Saturated Canary and colored him up like Anakin Skywalker, but with brown hair and eyes so that he resembles my GS.  This was so fun to put together.  I like how Master Yoda's beam is lighting up the light saber.  hehehe...   The caption was written with a gold gel pen and reads, "May the force be with you on your birthday young Padawan. Celebrate you will."   Here is a close-up of Force boy...

Force boy Brendan

I had fun coloring him up.  So glad I remembered that Krista had him in her shop.  He was perfect for my card.  I fussy cut him out and left a small white border all the way around.  Adhered both pieces to the black cardstock and hand wrote the note.  His mama was pleased to add another bday card to his growing stash.  It was a really fun party with lots of kids, candy, cake and food.  And two pinatas were sacrificed, poor R2. :(   All in all a good time was had and the birthday boy got some really awesome presents.  He's one lucky little boy.

May the Force be with you
Well that's all for today.  Thanks for stopping by and whether your crafting or working or just having a lazy day, "May the Force be with you in every way."

Hugs,
Leanne

Friday, November 15, 2013

KBD Aloha Friday Mid Inspiration - Fall

Scroll down or click HERE to find my Y&FH blog hop card.

Good morning and happy Aloha Friday!!

Today the Bees are back to share our mid-inspirations for our current Fall colors challenge at Kitty Bee Designs.  Stop over to the blog to see everyone's adorable creations.  Today I have a card featuring Hangin' Around Bear which you can purchase from the Kitty Bee Designs Etsy store.

Thinking of you - KBD Hangin' around bear

I started off making another tag using a couple MFT stacking pierced tags. Colored up my image with Distress ink pads and Copic markers.  Added a nice big brown button with some twine and a scrap piece of burlap that I cut in to the tab at the top of the tag.  I did some burlap coloring on it using the same ingredients as my last tag on the leaves.  I'll try to remember to take pictures next time I do this!  Anyhoos, I matted my tag onto a pretty striped piece of scrap paper from Colorbok.  I could have left it as a tag, but I remembered I had purchased a BASICGREY Indian Summer card kit from Ross and the theme was Fall so I chose one of the cards and followed the layout.  Once I was done I popped on my tag.  Worked out pretty well.

Happy Fall!

You still have time to link up to our challenge which ends on 11/22/13.  And don't forget, we're having a DT call over at Kitty Bee Designs.  If you'd like to be a part of a fun group of ladies creating designs with some kawaii >.< animal stamps then come check out our DT call HERE.  You have until November 30th or until the spots are filled to apply.  Good luck!

Mahalo for stopping by today!!  Have a fabulous Aloha Friday!!

Hugs,
Leanne

Y&FH Team Blog Hop Battle

Good morning everyone!!

Welcome to the Y&FH Team Yumi vs. Team Fumi Blog Hop Battle!  If you're here from Olivia's blog then you are on the right track!  If not, then head on over to Yumi & Fumi Handmade blog to start at the beginning.  You'll find all the details and things you need to do to win some blog hop prizes.

Team Yumi Yummies vs. Team Fumi Faves
Starts: 11/15/13, Midnight pst
Ends: 11/18/13, 11pm pst. 

Here is my Fumi fave prize giveaway:


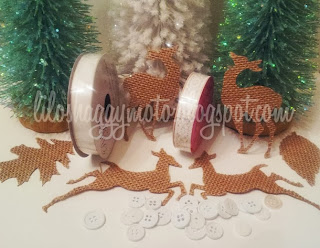
I've got  2 spools of ribbon (sheer sparkly & lace), buttons & die cut burlap paper reindeer and leaves.  I have been having tons of fun with burlap paper, and making tags.  Just getting in to the spirit of the Christmas holiday so that is where the buttons, animals, leaves and buttons come from.  The ribbon just "ties" everything together.  (hahaha)  Here's how I used these embellishments:

Winter Chuckles & Winter Fumi Christmas tags

These were the tags that we created on Saturday at the Carson Rubber Stamp show.  These embellishments or add-ons made these tags truly stand out.  Besides the items above I will throw in a few more things.  Let's just see what I have left over.  Take a closer look at each tag...

Winter Chuckles "Be Jolly"

Love how it turned out and using the different pieces really made this tag pop!  Here's the other one...

Winter Fumi "Holiday Cheer"

I can see my self either hanging these on our Christmas tree or decorating a bag.  Really had a lot of fun making these.  That's all I have for now, before you head on over to Renate's blog make sure you leave a comment and link up below too.

A reminder, here's what you need to do:
1. Go through the blog hop and leave a comment on everyone's blog post
2. When you go back to the Y&FH blog you will vote 1 time by leaving a comment with your favorite designer who you think used the theme the best. We'd also love to hear what you liked about their project so please include that in your comment.
3. Link up on the main blog for a chance at the grand prize!!
Mahalo for stopping by!!  Have a great Aloha Friday!!

Hugs,
Leanne


Wednesday, November 13, 2013

Didja Hear?


Hello!

Wow, has it really been that long since I last posted something?! Eek!! I have to get back on track.  I guess I'll start by sharing this card I made for our display at the Carson Rubber Stamp show.  (I'll share more on that on the Yumi & Fumi Handmade blog soon.)  Talk about quick and easy and I found a way to make a shaker card using a plastic bag instead of acetate.  Now I'm going to think twice about throwing those out!

Here's the card featuring Sister Stamps Turtle Set.  Love these little guys, they look like they are having a ton of fun and what ever they are talking about must be hilarious!  hahaha... 

Didja Hear? (Sister Stamps - Turtle set)

After coloring up the turtles I fussy cut them out with a small white border.  I had this turquoise blue and white chevron paper scrap left over and thought it looked like water, so then I thought... shaker card!!  I didn't have any acetate, but I did have a plastic bag hanging around.  Why not use that instead?  Boy was it much easier to use that then to use the acetate.  I adhered the turtles where I wanted them to be, added the handwritten sentiment to the bottom and then poured two different kinds of sequins in to the bag.  Taped the top shut and then using the washi tape technique to add that cute turquoise and white polka dot border.  I also added some white sheer sparkly ribbon and a green and white half "candy" to tie in with the green of the turtles.

Turtle set

Alrighty, that's all for tonight.  I have a few more projects to share, but I think I'll wait and space them out so it looks like I've been busy.  (lol)  BTW, if you're in the mood for a blog hop, the Y&FH teams are gearing up for one that you won't want to miss.  It all starts on Friday morning.  Hope to see you there!

Mahalo for stopping by!  Have a great evening!

Hugs,
Leanne