Sunday, November 24, 2013

Some Fall projects

Hello!

I was in the mood to make some small cards and a tag using this really pretty Fall bamboo washi paper from Hanko Designs. I added it to some kraft and mustard colored cardstock with a few additional accents: twine, buttons, ribbon and some canvas paper.  I didn't want to color all of the images I chose so I stamped two of them on to kraft cardstock and used a versamark pen to shade in the images.  First up is the tag I made using Kiki from Sister Stamps, a hello sentiment from Paper Smooches, a heart punch, a Fall colored canvas paper leaf, button, ribbon and twine...

Hello Fall tag with Kiki (Sister Stamps)

This next one is a small card featuring Shin-Shin from Sister Stamps.  Also stamped him on kraft cardstock and colored in with the same versamark pen.  Stamped the hello sentiment inside a punched heart.  Added some twine, a button, distressed the edges and lastly rounded the corners.

Hello Fall card with Shin-Shin (Sister Stamps)

This last card I shared on the Y&FH blog the other day.  I colored Summer Chuckles with a few Copics and decided to put him in a polaroid frame.  Stamped "many thanks" from Paper Smooches and attached it to the front of this small card.  Rounded the corners, distressed the edges and added some twine and I was done. (Playing in C4C213 challenge & 2 Sisters challenge #171)

Many Thanks from Summer Chuckles

That's all I have for today.  Wishing you all a really awesome Sunday!

Hugs,
Leanne

Wednesday, November 20, 2013

CARD for Lola

Today's card is a super CAS one.  My dad asked me to make a card for my aunty Lola's birthday.  Every year she and all her sisters take a trip to Las Vegas for her birthday.  My parents have been going every year to celebrate since my uncle passed away.  Each year I give her a colored image card, but this year I wanted to do something a little more grown up, but still sweet.  Here's what I came up with...

Birthday card for Aunty Lola

I used up more of that chevron and yellow wood grain papers.  I wish I had picked up a couple more sheets of it, I really like both.  I also used some of that pretty floral paper to create the layered flower pictured here using some Noor Designs 8-petal dies.  I alternated between the floral print and the yellow cardstock using all the dies that are in the set.  The leaves are cut with a Paper Smooches die (Poinsettia) and stamped with a Inkadinkado background stamp.  For the ticket, I stamped a Happy Birthday stamp sentiment from AmyR, masked it and stamped a wood grain background over it.  Added a button, a doily, some twine and rounded the corners on two sides and I was done.  Oh and I also distressed all the paper edges with Vintage Photo Distress inks.

Mahalo for stopping by today.  Glad it was a short post... Have a great day!

Hugs,
Leanne

Tuesday, November 19, 2013

Star Wars Birthday card

Hello!
I'm popping in with a fun card I made for my Godson's birthday.  He's turning 6 on Thursday, but his parents decided to have his birthday party this past Saturday.  The theme of the party, cause he's always having a theme, was Star Wars!! Woo Hoo!! Well now, his card had to be themed the same so I went to the internet and looked for some images.  I decided to keep it simple:

Star Wars birthday card

I took the Star Wars logo and added my own caption.... This was printed out on photo paper, sorry it looks so bad, I was in a hurry to get to the party and did not take as great a picture as I had hoped.  The card itself is black.  I matted the logo onto yellow cardstock and then to the black cardstock.  The inside was also fun.

Master Yoda wishes Padawan Brendan a Happy Birthday!!
 
I found this really cool picture of Master Yoda, so I printed it out, on photo paper and added some die cut words that spell out MASTER.  I also printed out that adorable The Force boy from Saturated Canary and colored him up like Anakin Skywalker, but with brown hair and eyes so that he resembles my GS.  This was so fun to put together.  I like how Master Yoda's beam is lighting up the light saber.  hehehe...   The caption was written with a gold gel pen and reads, "May the force be with you on your birthday young Padawan. Celebrate you will."   Here is a close-up of Force boy...

Force boy Brendan

I had fun coloring him up.  So glad I remembered that Krista had him in her shop.  He was perfect for my card.  I fussy cut him out and left a small white border all the way around.  Adhered both pieces to the black cardstock and hand wrote the note.  His mama was pleased to add another bday card to his growing stash.  It was a really fun party with lots of kids, candy, cake and food.  And two pinatas were sacrificed, poor R2. :(   All in all a good time was had and the birthday boy got some really awesome presents.  He's one lucky little boy.

May the Force be with you
Well that's all for today.  Thanks for stopping by and whether your crafting or working or just having a lazy day, "May the Force be with you in every way."

Hugs,
Leanne

Friday, November 15, 2013

KBD Aloha Friday Mid Inspiration - Fall

Scroll down or click HERE to find my Y&FH blog hop card.

Good morning and happy Aloha Friday!!

Today the Bees are back to share our mid-inspirations for our current Fall colors challenge at Kitty Bee Designs.  Stop over to the blog to see everyone's adorable creations.  Today I have a card featuring Hangin' Around Bear which you can purchase from the Kitty Bee Designs Etsy store.

Thinking of you - KBD Hangin' around bear

I started off making another tag using a couple MFT stacking pierced tags. Colored up my image with Distress ink pads and Copic markers.  Added a nice big brown button with some twine and a scrap piece of burlap that I cut in to the tab at the top of the tag.  I did some burlap coloring on it using the same ingredients as my last tag on the leaves.  I'll try to remember to take pictures next time I do this!  Anyhoos, I matted my tag onto a pretty striped piece of scrap paper from Colorbok.  I could have left it as a tag, but I remembered I had purchased a BASICGREY Indian Summer card kit from Ross and the theme was Fall so I chose one of the cards and followed the layout.  Once I was done I popped on my tag.  Worked out pretty well.

Happy Fall!

You still have time to link up to our challenge which ends on 11/22/13.  And don't forget, we're having a DT call over at Kitty Bee Designs.  If you'd like to be a part of a fun group of ladies creating designs with some kawaii >.< animal stamps then come check out our DT call HERE.  You have until November 30th or until the spots are filled to apply.  Good luck!

Mahalo for stopping by today!!  Have a fabulous Aloha Friday!!

Hugs,
Leanne

Y&FH Team Blog Hop Battle

Good morning everyone!!

Welcome to the Y&FH Team Yumi vs. Team Fumi Blog Hop Battle!  If you're here from Olivia's blog then you are on the right track!  If not, then head on over to Yumi & Fumi Handmade blog to start at the beginning.  You'll find all the details and things you need to do to win some blog hop prizes.

Team Yumi Yummies vs. Team Fumi Faves
Starts: 11/15/13, Midnight pst
Ends: 11/18/13, 11pm pst. 

Here is my Fumi fave prize giveaway:


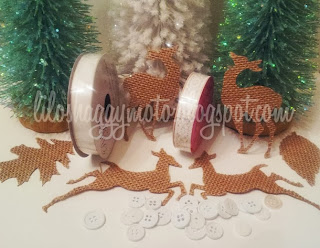
I've got  2 spools of ribbon (sheer sparkly & lace), buttons & die cut burlap paper reindeer and leaves.  I have been having tons of fun with burlap paper, and making tags.  Just getting in to the spirit of the Christmas holiday so that is where the buttons, animals, leaves and buttons come from.  The ribbon just "ties" everything together.  (hahaha)  Here's how I used these embellishments:

Winter Chuckles & Winter Fumi Christmas tags

These were the tags that we created on Saturday at the Carson Rubber Stamp show.  These embellishments or add-ons made these tags truly stand out.  Besides the items above I will throw in a few more things.  Let's just see what I have left over.  Take a closer look at each tag...

Winter Chuckles "Be Jolly"

Love how it turned out and using the different pieces really made this tag pop!  Here's the other one...

Winter Fumi "Holiday Cheer"

I can see my self either hanging these on our Christmas tree or decorating a bag.  Really had a lot of fun making these.  That's all I have for now, before you head on over to Renate's blog make sure you leave a comment and link up below too.

A reminder, here's what you need to do:
1. Go through the blog hop and leave a comment on everyone's blog post
2. When you go back to the Y&FH blog you will vote 1 time by leaving a comment with your favorite designer who you think used the theme the best. We'd also love to hear what you liked about their project so please include that in your comment.
3. Link up on the main blog for a chance at the grand prize!!
Mahalo for stopping by!!  Have a great Aloha Friday!!

Hugs,
Leanne


Wednesday, November 13, 2013

Didja Hear?


Hello!

Wow, has it really been that long since I last posted something?! Eek!! I have to get back on track.  I guess I'll start by sharing this card I made for our display at the Carson Rubber Stamp show.  (I'll share more on that on the Yumi & Fumi Handmade blog soon.)  Talk about quick and easy and I found a way to make a shaker card using a plastic bag instead of acetate.  Now I'm going to think twice about throwing those out!

Here's the card featuring Sister Stamps Turtle Set.  Love these little guys, they look like they are having a ton of fun and what ever they are talking about must be hilarious!  hahaha... 

Didja Hear? (Sister Stamps - Turtle set)

After coloring up the turtles I fussy cut them out with a small white border.  I had this turquoise blue and white chevron paper scrap left over and thought it looked like water, so then I thought... shaker card!!  I didn't have any acetate, but I did have a plastic bag hanging around.  Why not use that instead?  Boy was it much easier to use that then to use the acetate.  I adhered the turtles where I wanted them to be, added the handwritten sentiment to the bottom and then poured two different kinds of sequins in to the bag.  Taped the top shut and then using the washi tape technique to add that cute turquoise and white polka dot border.  I also added some white sheer sparkly ribbon and a green and white half "candy" to tie in with the green of the turtles.

Turtle set

Alrighty, that's all for tonight.  I have a few more projects to share, but I think I'll wait and space them out so it looks like I've been busy.  (lol)  BTW, if you're in the mood for a blog hop, the Y&FH teams are gearing up for one that you won't want to miss.  It all starts on Friday morning.  Hope to see you there!

Mahalo for stopping by!  Have a great evening!

Hugs,
Leanne

Friday, November 8, 2013

KBD CH #12 - Fall Colors

Happy Aloha Friday everyone!!

We're having a DT call over at Kitty Bee Designs.  If you'd like to be a part of a fun group of ladies creating designs with some kawaii >.< animal stamps then come check out our DT call HERE.  You have until November 30th or until the spots are filled to apply.  Good luck!

Ok, today the Bees are buzzing in to share our inspirations for our new Aloha Friday challenge:


I went online to see if I could find out what are the Fall colors for 2013 and found the picture below.  Not your typical fall colors right?


When I think of Fall colors I think of the leaves changing from greens to reds, yellows, oranges, something like this....


Yes, that is much better!  hahaha... but I guess it all depends if you're in to the traditional or the current fashion trends which will determine what you consider FALL colors to be.  I've been having lots of fun with tags lately.  Here is a Fall tag I made featuring an adorable Kitty Bee Owl.   :)


This was a lot of fun to make.  I used an adorable Kitty Bee Designs Kawaii Owl, burlap paper, Adirondack Alcohol inks, Viva Decor Colour Inka gold metallic rub, a Sizzix die and some beautiful paper from Colorbok to create this tag.  The tag itself measures 5 1/2" high x 3" wide.  It is backed by kraft cardstock to make it sturdier. I cut the beautiful paper down to match and I tried to cut out parts that I thought would make this Fall tag stand out without being too busy.  Bummer you can't tell but the leaf on the lower left corner is actually gold, like gold leaf.

Burlap Fall colored leaves

The leaves are made out of the burlap paper (DCWV) which was a great find for me.  I used a Tim Holtz Sizzix leaf die (has 3 different leaves on it) to make them and used the Adirondack inks and Viva Inka gold metallic rub to make leaves that would compliment my tag.  Sorry it's such a dark picture, I wish you could see how pretty the colors are.  I'll see if I can do a short tutorial on how I made these in another post.  It's all experiment and go with me, using products I purchased and have yet to use and also pieces of stuff left on my desk. I think I'll be making more of these. :)  To top it off I used some beautiful ribbon from May Arts and that embellishment (Mrs. Grossman's Natural Art) is something I picked up at Joann's eons ago.  So glad it finally has a home.  Here's another shot of the tag on it's side with a little more light on it.
Fall inspired tag featuring a Kitty Bee Kawaii owl

It's so shiny! (hahaha)  Make sure you stop by the Kitty Bee Designs blog to see what the rest of the Bees created using FALL colors.  There are some really awesome inspirations waiting for you to see.  We hope to see your creation, but before you link up make sure to read the rules, we'd really be sad to have to disqualify your project. 

Happy Fall!!

A reminder, if you're in the Carson, CA area this weekend (Nov 9-10) come by the Carson Community Center where the Rubber Stamp Convention is being held.  I'll be at the Yumi & Fumi Handmade booth.  For details click here.  Okie dokes everyone, I hope you have a wonderful Aloha Friday!!

Mahalo for stopping by!!

Hugs,
Leanne

Tuesday, November 5, 2013

Happy Birthday Cebelica!

Good morning!

Today Team Yumi & Team Fumi are tag-teaming to celebrate a wonderful teammate's birthday...

Happy Birthday Cebelica!!

Stop by the Yumi & Fumi Handmade blog to see all the beautiful creations from the Design Team and then hop on over to Cebelica's blog and leave her some birthday love.   Here's a simple card I made using Fumi with Turtle.

Happy Birthday Cebelica from Fumi w/ Turtle
Happy Birthday Cebelica, wishing you all the best today and always.  Have a fabulous day!!

Fumi with Turtle
Have a terrific day everyone and if it's also your special day, Happy Birthday!!

Hugs,
Leanne

Sunday, November 3, 2013

Y&FH CH #27 - Color Challenge (Reminder)

Hello!!

Today I am happy to be participating again with Team Fumi as we share our inspirations for our current challenge at Yumi & Fumi Handmade.  Here's a reminder:

Create a project using the above colors. 

So a few days ago I shared a card I made using those colors but did not make a Halloween themed project.  Instead I made a holiday themed card.  (For more details click HERE.)  For today I do have something Halloween themed, a big tag featuring Fumi Panda.

Trick or Treat with Fumi Panda

Ta-da! (hahaha)  I had so much fun with this one.  I used some old K&Company Halloween themed paper as well as some new DCWV papers.  The antique doily is a QuicKutz die from Lifestyle Crafts.  OMG I had to shim that puppy a few times in order for all the pieces to pop out!!  But it was worth it, it's a really pretty die.  The flowers are Sizzix by Tim Holtz and I've been wanting to use it for the longest time!  Kept it simple by using some scrap Halloween papers.  You can't tell but that green flower has embossed skulls on them.  (hahaha)  Kept the sentiment simple by using a CC Designs AmyR stamp.  Stamped it with Distress embossing ink and used white embossing powder to make it pop.  I added a black velvet ribbon on top and lastly my colored Fumi Panda image.  Oh and I distress inked all the way around the tag and some of the flowers with Vintage Photo Distress ink. 

Fumi Panda

Well I hope I was able to share some fun inspiration for our current challenge.  Now remember you don't have to go all Halloween on us, you can totally use the same colors for a different theme.  I'm serious it's super easy.  Don't believe me?  Well head on over to the Yumi & Fumi blog to see the rest of today's shares by the always amazingly talented Team Fumi.  As always, Mahalo for stopping by!!  Wishing you all a fabulous Sunday!

Hugs,
Leanne

Friday, November 1, 2013

LFF #64 - NBFFs for Life...

Happy Aloha Friday and Happy Nov 1st!

Wow, it's seems like the days are just passing way too fast!  November is going to be a very busy month, hopefully I'll be able to get all the things I need to do done.  It's been a while since I had a LFF post so I thought today would be a good day to rectify that.  For today's Lilo's Fun Friday I have a card that I made for Kathy.  She and I had been working for the same company for the last 7 years.  She found a new and exciting job and her last day was Wednesday.  It didn't take me too long to figure out what to use for her card.  Just how to complete it, here's what I came up with... (lots of pictures)

NBFFs for life...

I used the digi panda (x3) and bunny from Kitty Bee Designs, some word bubbles, computer generated sentiments and an Island Scrapbooking laser cut sentiment.  Except for the laser cut sentiment everything else was printed on kraft cardstock.  Kept it simple by mounting it to an 8x11 piece of black cardstock which is scored at 4 1/4 twice.  Rounded the corners on opposite ends for fun.  Here is a close-up of what each of the characters are saying...


So the four pandas represent our little lunch group and since she is no longer a panda anymore I turned her in to a bunny.  (hahaha)  Each of the captions represents one of the ladies in our group.  Here's what the inside looks like...

What we're really thinking...
I thought it would be totally funny to change up the captions on the inside to say what we're really thinking.  We had this running joke about any time one of us couldn't make it to lunch or were taking a day off we'd all say, Denied! or Not approved! (hahaha)  It was quite funny, still is, but she used to say it ALL THE TIME! (hahaha)  Gonna miss that!   Here are the close ups so you can see the captions...


Again I kept it super simple just added the images, text bubbles and sentiments...  I had one piece left so I decided to make a pocket for the back of the card so we could each write our own little notes to here, bits of wisdom we called it so whenever she was missing us she'd be able to pull them out and remember us.  The back is totally different.  I went completely opposite of the front and inside, but it turned out pretty sweet...

Back of the card
I used two background stamps, black ink, Noor 8-petal flower die, clean stone, black ribbon, stapler, a Post-it note, corner rounder and lots of Distress ink to make my own paper since I couldn't find anything that would match. Really like how it turned out.


So that each of us could write our own message to Kathy I laid down a Post-it Note as my mask and stamped over it.  To finish it off, I cut some black ribbon and using a stapler adhered it to one of the corners.  (This part was darn difficult, but no fingers were harmed... hahaha)  

"Sweet memories are a rare jewel which time polishes into perfection" - Unknown
Here is a close up of the sentiment and flower.  I stamped each of the petals (except the black ones) with the same background stamps and that smaller flower was from a punch. I thought the sentiment was perfect.  Really love how the back turned out as much as the front, it's like two different cards!  So happy she liked it too. ^.^

Here are some pictures from her last day with me and our NBFF lunch group.  Gonna miss her at work, but luckily she and I live in the same neighborhood so we can visit anytime...
NBFFs for Life
Me & Kathy
Well thanks so much for stopping by today.  Lot's to do before I head to work so wishing you all a Happy Aloha Friday!! 

Hugs,
Lilo